Friday, 16 September 2011

Post 22 - Final Artefact and leaflet designs

I have just finished the final edit for the showcase on Wednesday. It is just over 5 minutes in length as features a mixture of rendered animations as well as screen captured footage, which help to explain the technology behind it. I feel good about the work that I have put into the project. It has been extremely hectic at times and having to pull too many 'all nighters' I it has paid off and I feel that I have learnt a lot from it.


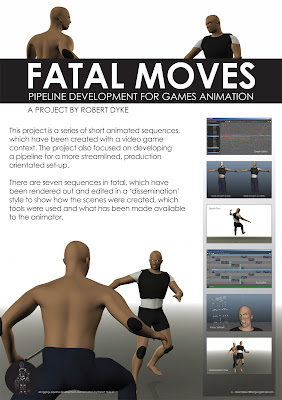
I have also designed and had printed both the A1 Poster (which will be mounted onto foam board) and some leaflets, explaining the product. One design focuses on the technology and the other on the project context.


Final Artefact - LINK
Animation & Rigging Show-reel - LINK


Leaflet One


Leaflet Two

Thursday, 15 September 2011

Post 21 - 30 Second Sting & Logo


As part of the showcase, we have been asked to provide a 30 second sting, which would highlight parts of our final product (this will be edited together with other students work in a showcase and shown throughout the day). I have spent a considerable amount of time rendering out the footage and then creating a scene in After Effects. I actually had it ready quite early on and handed it in, but then found out that it could of incorporated screen capture footage. As the project has taken much more of a technical, development route I thought the sting would benefit from more than just rendered animation.


I emailed the head of the department and he said it was fine to hand in an updated version. The link below is both the final 30 sting, as well as all of the animations I have been working on. During this process, I have also began to explore branding and have decided on the image the the left. This was hand drawn, scanned and then a grayscale neon filter was applied. I like this logo and didn't take too long to create.


30 Second Sting - LINK
All Animation Sequences - LINK


Tuesday, 13 September 2011

Post 20 - Final Animations

I have been grafting hard over the last couple of weeks so haven't blogged for a while. I have now taken Joe's advice on board and have worked on the animations some more. Tweaks which have taken place include


- loosening up some of the joints by staggering the limbs
- Fixing as much of the euler errors (think I've now got them all)
- Cleaning up lost keys in the saved clips
- General scene efficiency.


As the scene requires different camera motions and movements, I have also assigned the camera in the scene a character set. This allows me to plot out keyframes and movement for different animations and then saving them, just like a regular animation clip. This will speed up the process of rendering as setting up the cameras for me is the longest part (that and rendering out all footage as individual files)


This image shows the camera with three different motion paths. Each path represents a saved clip or track in the Trax Editor. Like the other character sets, the key frames saved can also be altered after saving it. 

Thursday, 8 September 2011

Post 19 - Euler Nightmares

As my animation sequences are becoming more dynamic and challenging, I have just stumbled across a major issue. This is a common problem that any animators suffer from. This is known as Gimbal lock. This occurs when an item (i.e. wrist control) is rotated passed a certain point. This can lead to crossing of axis (which is a nightmare when editing in the graph editor) and the mesh being influenced by the controller becomes warped.


Gimbal lock destroys lives


One method around this is to key every frame during the axis crossing phase. Another is to apply an axis modifier, which allows you to switch the order of rotation (which can also be keyed). This however cannot be done on my rig for some reason so I have resorted to key framing every transitional section (there weren't that many so was feasible). This has however forced me to use use 'gimbal' rotation rather than 'local' as it allows the animator to clearly see how the rig is being manipulated.


I have begun working on the next sequence which involves two rigs in the same scene and I have also created another tweaking pass for the walk cycles. When I have finished the ext animation, I will be putting them onto YouTube and emailing Joe the links for more feedback.


To improve the walk cycle, I also found this simple but effective video, which shows spine movement etc.


Skeleton walk - LINK

Post 18 - Floor Plane Improvments

Floor Plane with Ramp Texture


Continuing on from Joe's feedback, I have now altered the sequences in order for the rig to have correct weight distribution. I have also gotten rid of the harsh floor plane / horizon line using a nifty little trick. In the previous post, Joe suggested that I could apply a depth of field filter, or use some kind of environmental fog. Both of these techniques are post-rendering and so would take a lot longer (not to mention it is rather fiddly also).


I had a theory that if you made the floor plane transparent, but then configured it to get more transparent from the center outwards, this would create a softer line where the plane ends and would not be as render heavy. I posted a question onto the CG Society and got a reply the same day.


The solution is as follows:


Create what is called a 'ramp texture' material (basic alpha style black to white gradient) and set it to 'circular ramp'; going from black in the center to white on the edge. This would then be attached to the transparency lever for the original floor material. This did the trick and has made the scene much more pleasing. I originally also replaced the square plane for a circular one to reduce ugly corners, but found that this messed up the ramp texture, so I then reverted back to the square.


This solution was suggested by Mikael aka lostparanoia, a 3D VFX artist from Sweden.


Thursday, 1 September 2011

Post 17 - Walk Cycles 2nd Pass: Feedback

I have been sent some more helpful feedback from Joe about the 2nd pass cycles I sent him. This time round, the main areas he highlighted were as follows:


Regular walk - Limbs are good but back too stiff (no pendulum motion) and hips also not moving as they should.


Minor & Severe Injury - Also suffers from stiffness of the back, and the weight distribution is very limited (most notable in the minor injury). The hips do not counter any motion the character makes. In addition, the severe injury walk has a twisted foot which wouldn't be possible in real life so he suggested that is altered.


He liked the death animations and said he'd comment on those once the walk cycles were improved and of the same quality. So the focus is on the hips / back, needing to be loosened up and for the weight distribution (or plum line) to be reworked. Once these points were given to me, I could see what he meant straight away and I have now begun work on improving these in order to take them to the next pass.


He also commented on the harsh contrast between the floor plane (grey) and the environment (white) and so suggested that I look into using either a post production fog, or depth of field to soften the line. This was an aesthetic point but a very important one. Once I have tweaked the animation more, I will look into improving the scene. He also gave me a link to the new Assassins Creed trailer. he explained that people tend to favour one foot/ leg over the other and although the game uses motion capture data, their is a couple of good examples of this.


Assassin's Creed Revelations Trailer - LINK

Thursday, 11 August 2011

Post 16 - Death Animations & Walk Tweaks


Its been a couple of weeks since my last post, but I have now completed another two animation sequences. These are called 'Death One' and Death Two.


Death One features the character being struck on the shoulder / side and consequently falling to his knees and ending face down on the floor. This animation features all of the usual animation techniques such as staggering actions, weights distribution and 'bouncing limbs' (i.e. limbs responding as they should to hitting a surface and continue to move/bounce). As my work is becoming more and more challenging, I am now looking more closely at some of the gaming references I mentioned in earlier posts (namely Resident Evil 5 and Halo Reach).


On top of this, I am now in the habit of recording myself acting out particular sequences. Both death sequences were created initially from looking at these recordings. Below are links to the sequences and below them are the other walk cycles, which I have now improved, using Joe's feedback.


Some of the things which have been tweaked include the following:


- Lighting stripped down
- Static 'two-point' camera set-up introduced
- Upper body motion toned down
- Regular walk hips and head/neck staggered


'NEW' Death One - LINK
'NEW' Death Two - LINK
Walk Cycle 2nd PassLINK
Minor Injury Walk Cycle 2nd PassLINK
Severe Injury Walk Cycle 2nd Pass - LINK